

Introduction to Homemade Andes Mint Chocolates
The nostalgia of Andes Mints and the joy of making them at home
If you have fond memories of unwrapping those little green foil candies after a meal, you’re not alone. Andes Mints hold a special place in many of our hearts, often associated with celebrations, special dinners, or even just cozy evenings on the couch. But have you ever thought about recreating that delightful experience right in your own kitchen? Making Homemade Andes Mint Chocolates is a fun and rewarding endeavor, and it allows you to enjoy a treat that’s not only delicious but also tailored to your dietary preferences, whether you’re following a Paleo, Keto, or Vegan lifestyle.
The process of making these chocolates can be as joyful as the result itself. Picture this: the sound of melted chocolate blending harmoniously with a hint of mint, filling your kitchen with an enticing aroma. Every step, from melting the chocolate to carefully spooning the mint filling and then assembling the layers, is an opportunity to infuse your personal touch into each piece.
Making Homemade Andes Mint Chocolates allows you to experiment with different ingredients. For example, you can opt for organic dark chocolate, natural sweeteners, or even enhance the mint flavor using essential oils or fresh mint. If you’re curious about the health benefits of dark chocolate, you might be interested in reading this article on Healthline, where they explore various advantages, including heart health and antioxidants.
Additionally, crafting these treats can be a fantastic opportunity for social gatherings. Just think about how impressive it would be to share homemade mint chocolates with friends during a game night or a cozy dinner. They’re not just candies; they’re a conversation starter, a way to connect with loved ones over a shared indulgence.
So, if you’re ready to turn those delightful memories into a homemade treat that everyone can enjoy, let’s dive into this simple yet satisfying recipe for Homemade Andes Mint Chocolates. Whether for yourself or to impress your friends, you won’t want to miss out on this delectable experience!

Ingredients for Homemade Andes Mint Chocolates
Creating homemade Andes mint chocolates is a delightful experience, and it all begins with the right ingredients. Here’s what you’ll need to craft these delicious treats.
Essential Ingredients for the Filling
To achieve that iconic minty flavor, gather the following components:
- Coconut Cream: This forms the rich, creamy base that makes the filling so luscious.
- Powdered Erythritol or Coconut Sugar: For sweetening without the guilt, opt for either of these low-glycemic alternatives.
- Peppermint Extract: A few drops will infuse your filling with that refreshing mint taste.
- Natural Green Food Coloring: Just a tiny bit will give your filling an appealing hue, reminiscent of the classic Andes candies.
Ingredients Needed for the Chocolate Coating
For the delicious outer layer, you’ll need:
- Dairy-Free Dark Chocolate: Aim for a high-quality, vegan chocolate that’s rich in cocoa. This is essential for that heavenly chocolate experience.
- Coconut Oil: Helps the chocolate coat evenly and adds a nice sheen.
With these simple yet essential ingredients, you’re well on your way to creating scrumptious homemade Andes mint chocolates. Plus, they can easily fit into your paleo, keto, or vegan lifestyle! Curious for more low-carb sweetness? Check out healthline.com for more healthy dessert ideas.
Preparing Homemade Andes Mint Chocolates
Creating your own Homemade Andes Mint Chocolates is not just a delightful culinary experiment; it also allows you to control the ingredients to fit your lifestyle preferences, whether you’re going paleo, keto, or vegan. Let’s walk through the process step-by-step, ensuring your minty creations turn out perfectly.
Melting the cacao butter for the filling
To start, you’ll want to acquire high-quality cacao butter, which forms the base of our creamy chocolate filling. It can be found easily at health food stores or online. Chop the cacao butter into small pieces to facilitate even melting. You can melt it using a double boiler—this gentle method helps prevent overheating.
- Fill the bottom pot with water and place it on medium heat.
- Add the cacao butter to the top pot and stir occasionally until melted completely.
This step truly transforms the cacao butter into a luscious oasis of cocoa goodness. Be sure to keep an eye on it, as it can quickly turn from liquid to hardening if left too long. If you’re curious about the benefits of cacao butter, check out this insightful article from Healthline.
Mixing in sweeteners and flavorings
Once your cacao butter has melted and is all warm and inviting, it’s time to infuse it with sweeteners and flavors to create that signature minty taste.
- Choose a sweetener that suits your dietary needs; options like stevia or erythritol work wonders for keto and paleo diets.
- For flavorings, include peppermint extract. Start with a small amount, like ½ teaspoon, and taste as you go. You can always add more if you desire a stronger mint flavor.
Whisk everything together until it’s well combined. The aroma of the peppermint swirling through the warm cacao butter is simply divine! Don’t forget to taste-test—this is the fun part!
Pouring the filling into molds and freezing
With your mix still warm, carefully pour it into silicone candy molds or any small, flat tray lined with parchment paper. If you’re using molds, be sure they’re flexible to make the unmolding process easier later on.
- Fill each mold about halfway to leave room for the chocolate coating.
- Gently tap the mold on the countertop to eliminate any air bubbles.
Once you’ve finished pouring, place the molds in the freezer for about 30 minutes or until completely set. This waiting time doesn’t just build anticipation—it’s essential for the filling to firm up perfectly.
Melting the dark chocolate for coating
While the filling sets, it’s time to prepare the dark chocolate coating. Opt for a high-quality dark chocolate that’s low in sugar to keep it in line with your dietary preferences.
- Chop the chocolate into small pieces, similar to how you did with the cacao butter.
- Melt it using the same double boiler method, stirring continuously to ensure a smooth consistency.
If you’re curious about the health benefits of dark chocolate, the American Heart Association provides an insightful overview.
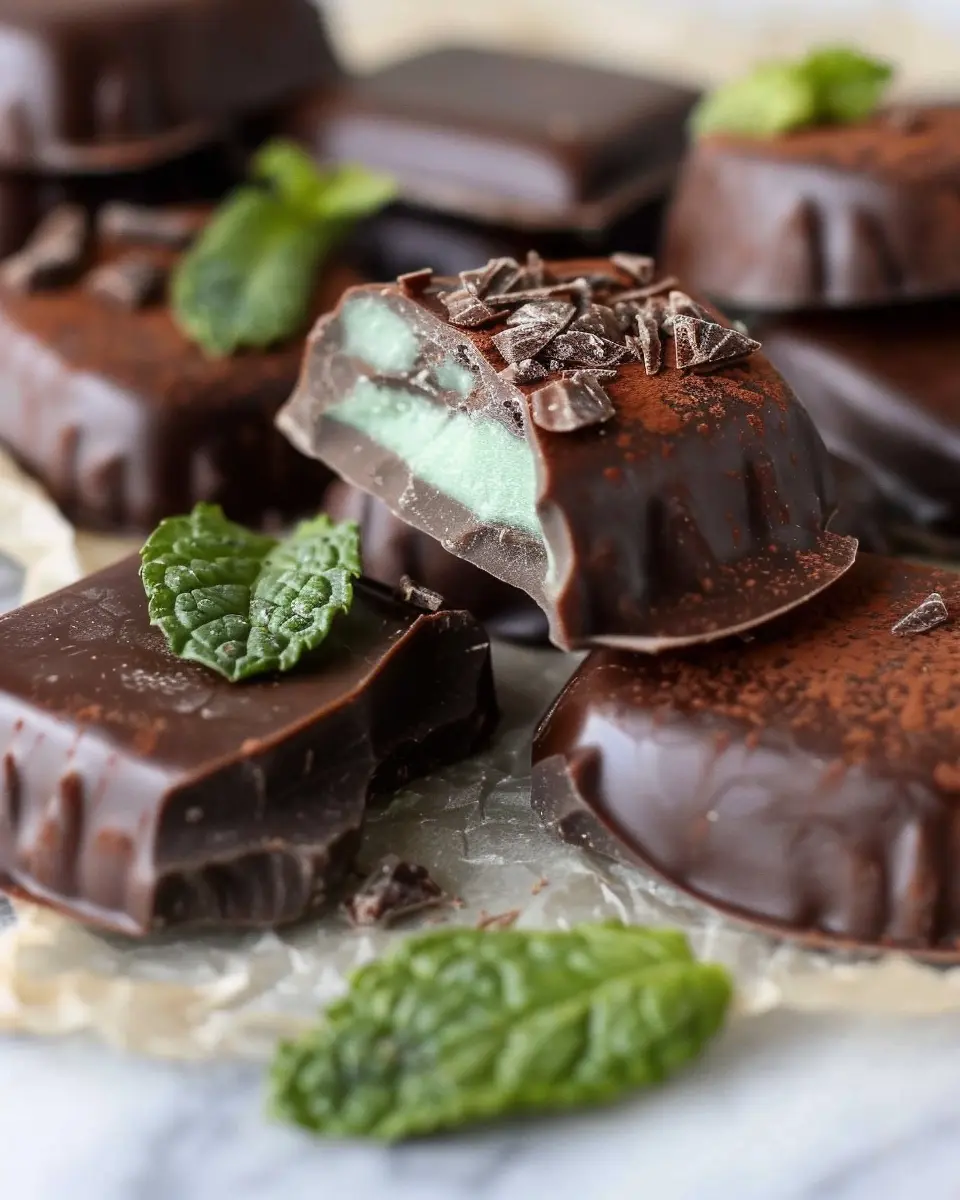
Dipping and setting the mints
Now comes the moment of truth! Retrieve your filled molds from the freezer. Gently pop the filled chocolates out (this is where silicone molds shine) and prepare for the final touch.
- Dip each chocolate into the melted dark chocolate, allowing excess to drip off.
- Place the coated chocolates back onto a parchment-lined tray.
Let those beauties set for a few minutes in the refrigerator. You can speed up the process by using the freezer again if you’re in a hurry.
And voilà—your Homemade Andes Mint Chocolates are ready to be enjoyed! These little treats are not just a satisfying indulgence; they also align with your dietary goals. Share them with friends or savor them solo in front of a good movie; you deserve it!
For more related recipes, you might want to check out other healthy treat options on sites like The Spruce Eats or AllRecipes. Enjoy your homemade minty delights!
Variations on Homemade Andes Mint Chocolates
Crafting your own Homemade Andes Mint Chocolates opens up a world of delicious variations to suit different dietary preferences. Let’s dive into some unique twists that not only cater to various diets but also enhance flavors, making your chocolates even more delightful!
Different Sweetener Options for Various Diets
When it comes to sweeteners, there’s no one-size-fits-all solution. Depending on your dietary needs, you can easily substitute traditional sugar with alternatives:
- Keto-friendly: Try monk fruit or erythritol, both of which provide sweetness without the carbs.
- Paleo: Raw honey or maple syrup can be great options, adding a touch of natural sweetness.
- Vegan: Opt for agave syrup or coconut sugar for a plant-based sweetener that’s still delicious.
Experimenting with these sweeteners can not only satisfy your sweet tooth but also keep your Homemade Andes Mint Chocolates aligned with your diet.
Customizing the Flavor with Essential Oils
Want to elevate your homemade chocolates to gourmet status? Essential oils are a fantastic way to explore new flavors. Consider infusing your chocolate with:
- Peppermint oil: A classic choice that enhances the minty flavor.
- Vanilla oil: For a smooth, rich undertone that can round out the sweetness.
- Orange or lemon oil: These bright citrus flavors can add a fresh twist to your minty treats.
Just a drop or two can make a big difference, transforming your Homemade Andes Mint Chocolates into a scrumptious, sophisticated snack.
Feel free to explore different combinations and share your favorites with friends! For more insights on sweetener options and essential oils, check out resources like Healthline or The Spruce Eats. Enjoy crafting and indulging in your deliciously personalized chocolates!
Cooking Tips and Notes for Homemade Andes Mint Chocolates
Best Practices for Working with Cacao Butter
When making Homemade Andes Mint Chocolates, working with cacao butter can be a delight if you follow a few best practices:
- Gentle Melting: Always melt cacao butter slowly using a double boiler or a microwave at short intervals. This prevents overheating, which can affect its texture.
- Temperature Control: Keep an eye on the temperature; cacao butter should ideally be melted around 100°F to preserve its properties.
- Combine Gradually: If you’re adding sweeteners or flavor extracts, do it gradually. A little goes a long way, especially when aiming for that perfect minty chocolate balance!
Storage Tips for Longevity and Freshness
To keep your Homemade Andes Mint Chocolates fresh:
- Cool and Dry: Store them in a cool, dry place away from sunlight. A cupboard is usually perfect.
- Airtight Containers: Use airtight containers to prevent exposure to air, which can lead to spillage and loss of flavor.
- Refrigeration: For extended freshness, you can keep them in the fridge. Just be sure to allow them to come to room temperature before enjoying to restore that rich, melted texture.
For more tips on preserving chocolate, check out expert advice on The Chocolate Life. Happy cooking!

Serving suggestions for Homemade Andes Mint Chocolates
Creative Presentation for Special Occasions
When you whip up a batch of Homemade Andes Mint Chocolates, presentation can elevate the entire experience. Consider placing the chocolates in a beautiful, decorative box or on a festive platter. For a personal touch, you might wrap each piece in colorful foil or parchment paper tied with a ribbon. Creating a small dessert table with these chocolates as the star can make birthdays or holiday gatherings truly memorable.
Delightful Pairing Ideas with Coffee or Tea
Serving Homemade Andes Mint Chocolates alongside a warm cup of coffee or herbal tea can take your tasting experience to new heights. Try these delightful pairings:
- Rich Dark Coffee: The boldness complements the mint flavor, creating a perfect contrast.
- Mint Tea: Double the mint for a refreshing treat that’s perfect for post-meal enjoyment.
- Chai Latte: The spices in chai create a wonderful balance with the chocolate’s sweetness.
Sharing a sweet treat while sipping your favorite drink can make a cozy evening even more delightful. What’s your favorite brew to pair with these chocolates? For more pairing inspiration, check out The Spruce Eats for their tasty suggestions. Enjoy every delicious moment!
Time breakdown for Homemade Andes Mint Chocolates
Preparation time
Getting started on your Homemade Andes Mint Chocolates only takes about 15 minutes. Gather your ingredients—think rich dark chocolate, refreshing mint extract, and any sweeteners per your dietary needs. The quicker you prep, the sooner you can indulge!
Freezing time
Once you’ve poured your chocolate mixture into molds, pop them in the freezer. This step can take about 30 to 45 minutes for them to set perfectly. Make sure to resist the urge to peek too often; their transformation into delectable treats is worth a little patience.
Total time
In total, you’re looking at roughly 1 to 1.5 hours, including both preparation and freezing. Imagine having homemade chocolates ready in a fraction of a weekend while enjoying quality time with friends or family! For more tips on similar desserts, check out this article on chocolate-making techniques.
Whether you’re following a Paleo, Keto, or Vegan diet, these chocolates are a delightful addition to your treat repertoire!
Nutritional Facts for Homemade Andes Mint Chocolates
Caloric Content and Dietary Information
When enjoying Homemade Andes Mint Chocolates, understanding the caloric content and dietary info can help you savor each bite guilt-free. Each piece typically contains around 50-70 calories, depending on the specific ingredients used. They’re often sugar-free, making them a perfect treat for those following a Paleo, Keto, or Vegan lifestyle. Plus, they’re refined sugar-free!
Ingredients Breakdown for Different Diets
For those with dietary preferences, here’s a quick breakdown of the key ingredients:
- Cocoa Powder: Packed with antioxidants, suitable for all diets.
- Coconut Oil: A healthy fat endorsed in Keto and Paleo diets.
- Maple Syrup or Agave Nectar: Plant-based sweeteners for a Vegan option.
- Peppermint Extract: Adds refreshing flavor, universally friendly.
Whether you’re indulging in a Keto regimen or simply want a sweet treat that fits your dietary lifestyle, these chocolates cater to various needs! Curious to learn more? Check out this guide on healthy fats for more insights!
FAQs about Homemade Andes Mint Chocolates
Can I substitute cacao butter with other fats?
Absolutely! While cacao butter lends a smooth texture and a rich chocolate flavor to your Homemade Andes Mint Chocolates, you can explore alternatives such as coconut oil or palm oil. Keep in mind that these substitutes might alter the taste slightly. Coconut oil can add a hint of tropical flavor, which some people enjoy, but be cautious of the melting point. If you choose to use coconut oil, consider chilling your chocolates to maintain their shape.
How do I adjust sweetness for different palates?
Sweetness is very subjective! If you want to accommodate different preferences, try these tips:
- Stevia or Erythritol: These are excellent low-calorie sweeteners that can be easily adjusted. Start with a small amount and increase to taste.
- Maple syrup or agave nectar: For those who prefer a natural sweetness, these are great options. Just remember, they may add a bit of moisture, so adjust your chocolate ratio accordingly.
Finding that perfect balance can elevate your Homemade Andes Mint Chocolates and make them appealing to everyone.
What can I do with leftover chocolate?
Leftover chocolate is not a dilemma; it’s an opportunity! Here are some creative ideas for using up that chocolaty goodness:
- Dipping Fruits: Melt the leftover chocolate and dip strawberries, bananas, or apple slices for a delicious treat.
- Drizzling on Desserts: Use the chocolate as a drizzle over cakes or ice cream to enhance presentation and flavor.
- Making Chocolate Bark: Mix in nuts, seeds, or dried fruits, pour onto a parchment-lined baking sheet, and let it set for a delightful snack.
With these tips, you can ensure that your Homemade Andes Mint Chocolates are not only tasty but also versatile! For more chocolate inspiration, check out resources from The Chocolate Life to expand your chocolate-making knowledge.
Conclusion on Homemade Andes Mint Chocolates
The joy of creating homemade Andes Mint Chocolates goes beyond simply satisfying your sweet tooth—it’s about the warmth and connection they foster. Imagine the smiles on your loved ones’ faces as they savor your delicious creations. Sharing these rich, minty delights can transform any gathering into a memorable occasion. Plus, with their Paleo, Keto, and Vegan profiles, everyone can indulge guilt-free!
If you’re looking for more delightful recipes to share, consider exploring Paleo-friendly desserts or checking out tips on the benefits of dark chocolate in moderation. Get ready to spread joy, one chocolate at a time!
PrintHomemade Andes Mint Chocolates: Easy Paleo, Keto, Vegan Treats

Deliciously rich and easy to make, these Homemade Andes Mint Chocolates are the perfect treat for anyone following a paleo, keto, or vegan diet.
- Prep Time: 15 minutes
- Cook Time: 5 minutes
- Total Time: 20 minutes
- Yield: 12 pieces
- Category: Dessert
- Method: Chilling
- Cuisine: American
- Diet: Vegan
Ingredients
- 1 cup almond butter
- 1/4 cup cocoa powder
- 1/4 cup maple syrup
- 1 teaspoon peppermint extract
- 1/4 cup coconut oil
Instructions
- In a mixing bowl, combine the almond butter, cocoa powder, maple syrup, and peppermint extract.
- In a small saucepan, melt the coconut oil over low heat.
- Add the melted coconut oil to the mixture and stir until smooth.
- Pour the mixture into a chocolate mold or a lined baking dish.
- Chill in the refrigerator until firm.
- Once set, remove from the mold and cut into squares if necessary.
- Store in an airtight container in the fridge.
Notes
- These chocolates can be customized with different flavor extracts.
- Try adding a pinch of sea salt on top before chilling for added flavor.
Nutrition
- Serving Size: 2 pieces
- Calories: 110
- Sugar: 5g
- Sodium: 1mg
- Fat: 9g
- Saturated Fat: 5g
- Unsaturated Fat: 3g
- Trans Fat: 0g
- Carbohydrates: 8g
- Fiber: 2g
- Protein: 3g
- Cholesterol: 0mg